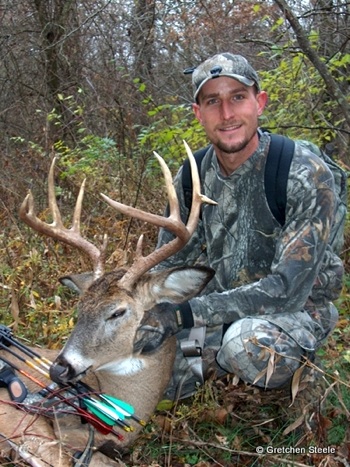
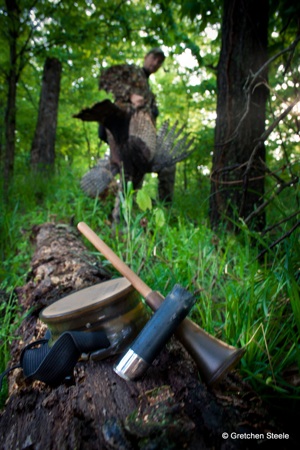
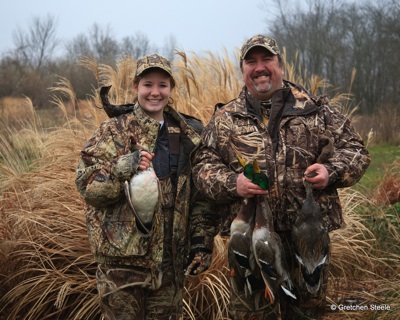
This season, instead of pictures with the buck in the bed of a pickup, hanging from a tree, lying on the floor of the shop, take the time to capture a photographic memory of that hunt that will be a wall hanger right along with your trophy! For those of you wanting to improve the quality of your hunting memory photos, here are some simple tips.
1) Think like a photographer
Find a good location with a background habitat that is similar to that of where you hunt. Better yet, take the photos at the site of the kill (the background alone if taken at the hunt site can create a richer and fuller memory of the hunt). If such conditions are not favorable at the hunt site, no worries, be creative. Such backdrops as lake or stream bank, a small stand of trees, even a fencerow will work. A photo with your deer stand in the background, the cabin, deer camp, etc., also serves to preserve the memory of the day. The key is to keep background distractions to a minimum, and take the time to set up the shot. A quick snap with your cell phone is great for sending out to all of your pals is fun, but don’t you also want a good portrait suitable to hang on the wall along side your mount or to tuck into the family Christmas card? The point here is to take the time to set up your shots.
 2) Clean things up
Yes, your friends and colleagues will most like want to see exactly the damage done by your brand of broadheads or slugs, and in that case a few snaps of the entrance and exit wounds make sense. After those are captured, CLEAN THINGS UP!! Take the time to grab a jug of water and some shop towels and take it to your deer. Or better yet, pack a package of wet wipes along and use them. Either method you choose, wash off the bloody spots, smooth back the hair as best you can and moisten up the eyes and nose. You can dribble some water from your water bottle into the eyes to moisten them up a bit, just wipe off and squirt a bit of water on the nose as well. (I know some trophy and hunt photographers who go to the extreme of carrying glass eyes with them, just in case the eyes of a deer they are photographing have already sunken). Position the deer so that a large gaping exit wound is away from the camera, or drape your jacket, bow, gun, a few leaves or small branch with a few leaves over it – pine boughs work especially well for this task – over it so that it isn’t quite so obvious.
Remember, cleaning up isn’t just for the creatures. Give yourself a little once over as well. Ditch the bloody jacket, wipe off your face with one those handy wet wipes – spiff up a little. Hats … oh the dreaded hat issue – While we all know that sometimes hat hair just can’t be saved … the problem with a baseball hat is that it tends to throw shadows just over your eyes and we want to see the pride and excitement in those eyes – so don a stocking hat if you must! Alternately position your hat so the brim is a little more upward, revealing more of your face and eyes.
 3) Find the trophy’s best look or feature
If you’re the one on camera duty, pose the hunter and the game with different positions and animal angles in an attempt to find the best shots. Actually take the time to look through the camera at different angles before you start clicking the shutter. Even consider moving the trophy several times to take advantage of different angles, placements and locales. If you can – zoom in and shoot from below a particularly impressive set of antlers, cradle the head if it’s a massive old toad to help show the scale. Even if you are resting your camera on a stump and using the self- timer, you can achieve some of these things.
4) Take lots of photos
Most of us are shooting with digital these days and memory cards are cheap! Think about the time and money you have spent on gear, licenses, food, leases, in the pursuit of these hunting memories, so don’t skimp on the number of images you shoot! Keep in mind that these pictures of your trophy are keepsakes, something your children and grandchildren will treasure in the years to come. If only one photo in the large number of exposures you take comes out perfectly, well then, that is all you need for a lifetime of memories.
5) Use a tripod, if you can, to stabilize your shots
For those who have been with me when I’m shooting – you folks have just fainted at this tip – to say I’m not a fan of tripods is putting it mildly, but they can make a good shot better, and for the casual photographer they are a must, especially since many hunting trophy photos are taken in lower light conditions. Even a stump or something solid can be used to rest your camera. For those of us who spend a great deal of time in the deer woods, on a duck slough or in a spring turkey hardwood ridge a tripod with a self-timing camera should be considered a necessity. There are plenty of light weight collapsible models out there.
6) Lighting can make or break your photos
A high, hard sun makes for difficult lighting conditions. The best light is the slanting light of early morning or late afternoon. What we photographers call the golden hours. That’s right, about the time you want to be hunting. Sacrificing a morning or evenings hunt to ensure you are able to take some good quality photos will be worth it when the hunt is over. Taking lots of pictures can help ensure that one or more of your camera angles will work well with your light conditions. In many cases, camera angle can take advantage of the shadows and highlights the light can create. If need be move into a shady area, but watch for odd shadows from branches etc that may fall across your subject’s face. If your camera has an option for fill flash, this can be very helpful in insuring that the hunter and trophy are well lit as well. If you use the flash on your camera and it seems that shadows and lighting is harsh a bit of tissue placed over the flash will diffuse and soften the light.
 7) The old philosophy of making sure the sun is always at your back does not always apply
If you are taking your photos early in the morning or later in the day, actually taking photos into or just at an angle to the sun can produce a photo with incredible detail: so be creative. Often times if the sun is at the camera’s back it will create harsh shadows and squinty eyes, so remember we want to see eyes full of pride and excitement – not squinting because the mid morning sun is burning out your retinas! And speaking of the eyes – please take off your sunglasses if you are wearing them!
I like to add a few little extras to the shots I do. A spray of golden rod, acorns, and persimmons scattered about, cattails and rushes, a branch with brightly colored leaves, any number of natural features are usually close by and can add an extra bit of interest and color to your photo.
I know what you’re thinking at this point – “Yeah, but you have all that fancy schmancy camera equipment. I have a point and shoot cheapy.” As far as a camera goes, you really don’t need anything fancy. Any camera can take a photograph that can capture the memory of the hunt worth sharing with friends and family. The key is being serious about your shot and taking your time. Having a camera with a zoom can really help the quality of your shot. If you do have a zoom lens to use, take your photos between the 70 mm and 90 mm range. This is considered an optimal portrait range, and this is what you are trying to achieve – a trophy portrait. This focal length also helps manage the “big nose syndrome” you see in so many photos. These are shots where the animal and the hunter are so out of balance it looks unrealistic. Get down on the same level as your subject as well rather than standing and shooting when the trophy and the hunter are kneeling.
The first time you go through the routine of staging good quality trophy photos for your hunting party or friends , you may find yourself subjected to lots of moaning, groaning and hurry it up comments, folks are often in hurry to get things moving along after taking a trophy. They tend to be a little impatient, so be sure to reassure them that they will appreciate the 20-30 minutes that it might take to get everything done correctly for an outstanding trophy portrait. Show them a quick preview of the initial images on your camera – they’ll usually slow right down, get in the groove and in many cases even get a little hammy and pose more!
Keep in mind, you are not just taking photos, you are capturing memories!
 Gretchen Steele of Coulterville, Ill., owns and operates Steele Photo Services. Gretchen is a Southern Illinois native and has been traversing the wild spaces of Illinois since her childhood. She retired as Public Health Nurse in 2003 to pursue her passion of outdoor and wildlife photography full time. Her award winning work has been featured in many outdoor media outlets, and has been exhibited in various venues across the nation. A lifetime of wild crafting and wild foraging has made Gretchen a well respected authority on Illinois edible and medicinal wild plants and fungi.
In addition to serving as contributing writer and photographer in the print market Gretchen authors two outdoor related blogs : http://siloforests.blogspot.com/ ‐ In the Forests and The Fields and http://www.prairiestateoutdoors.com/index.php?/gretchens/ ‐ Through the Lens
Thank you! I am always grateful for the women who enjoy the outdoors and share about heir passion with everyone. Great tips and ideas. I’ll be using some of them shortly! All the best. Jc
Fantastic article…Richard has always been so critical of photos so I learned early on that the “buck in the truck” or “riding the harvest” photos were not going to be a part of our photo library. We keep a kit with us for pictures and always make sure to have a tripod and remote. One thing you suggested, TAKING MANY PHOTOS is something that cannot be stressed enough…especially as a writer. It is important to have never seen, never printed photos for future articles. We usually take about 20 to 40 pictures of a harvest in different areas or poses then I bank the absolute highest quality photos (if even only 1 but usually 2 or 3) for future use in articles or online submissions.
I have so much to learn with the DSLR camera but I can say this for sure, I AM THANKFUL for digital memory cards, because I use the delete button about 40% of the time. LOL!
Thank you for your article and tips. I am going to re-post this on Facebook! It might save someone the heartache of not getting those pictures of a lifetime.
Nancy Jo
Gretchen,
Thanks for the tips, but I think I’d rather just have you along with me! 😉
Thanks, Nancy Jo, for the Facebook Shoutout to Gretchen about her great photo tips here at The WON. I want to go afield with her and her camera sometime, and just soak up her energy somewhat, as well as photo tips!
John,
You and me both … thankful for women who love the outdoors. Thanks for reading and commenting. Come on back anytime!